If you have already had the chance to work with different image/graphics formats, you know that there are many, many different ones available. The most important distinction between them all though (especially when it comes to graphic design), is whether they are VECTOR GRAPHICS and RASTER GRAPHICS.
Indeed, one of the main differentiating factors between image formats is whether they rely on raster or vector graphics. There are important differences between these two kind of graphics, and each has its own advantages and inconvenients, making them more or less suitable for specific uses. Let’s have a closer look.
RASTER (BITMAP) GRAPHICS
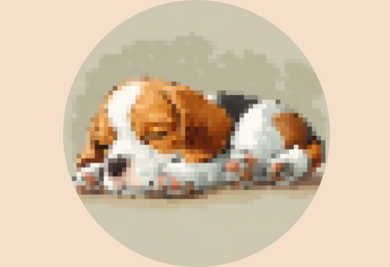
Let's start off with ‘Raster’ graphics (aka Bitmap). Raster images are ‘pixel-based’. This means, they are made up of individual “pixels”, which are the little squares that you see on your screen when you magnify an image, like this:

Each single “pixel” contains individual colour information, so when multiple pixels are combined, an image is formed.
Each image, when digitalised, is set up with a defined number of pixels. The higher the number of pixels and the smaller the dimensions of a single pixel, the sharper the final image resolution (more colour detail stored overall).
The resolution of an image displayed on a screen is measured in the PPI (“Pixels Per Inch”). The higher the PPI value, the higher the number of pixels clustered together to form a clear and higher-resolution image. When talking about printed images, this resolution measure is known as DPI (“Dots Per Inch”), and refers to the density of printed dots (dots containing colour information). The higher the DPI, the higher the final resolution of the printed image and the higher its clarity.
DPI (‘Dots Per Inch’):

So far so good, it’s all logical!
Lets keep it up.
The number of pixels that makes up an image always remains constant and therefore when the image is enlarged, so are the pixels (you can’t add pixels). This pixel enlargement directly impacts resolution in a negative way, since enlarging an image to twice its original size stretches its pixels in the same proportion. What is left is an image with ¼ (25%) of the original pixels per square inch, not great!
That right there is a direct illustration of raster images’ major drawback: their size cannot be changed without affecting their resolution and sharpness. To counter this, images can include more pixels, but this increases the size of the files, which can become problematic as they require more storage space on your beloved hard-drive and can cause delays during transfers or even when uploading to a website (like Gogoprint) for instance.
So all-in-all, raster graphics have the advantage of being very accurate representations of reality or your imagination (even complex gradients and shades can be faithfully represented), and can in the right circumstances be very high resolution (at the cost of a larger file size). In the end, the final quality of your prints is determined by the number of pixels / dots per inch (PPI / DPI) in the images that you use. So to be safe and to avoid significant resolution-loss when enlarging raster images, simply ensure you are using images with a high enough PPI / DPI when starting on your project.
One final advantage to raster graphics appears during the editing process. Each and every single pixel composing an image can be edited individually. This is very beneficial for super precise editing.
Raster-based formats include TIF, JPEG, PNG, PSD, GIF, and many more, which can be edited with software such as Adobe Photoshop, Adobe Fireworks, etc.
Hopefully this should have given you an overview of what raster graphics are and why we use them in certain cases.
Now let’s have a look at our second major category: vector graphics.
VECTOR GRAPHICS
Unlike raster graphics, which are pixel-based, vector graphics are simply mathematical calculations that form shapes. Sounds complex? Well it is, so let’s keep it simple.
You might remember hearing the word “vector” in math class (probably not the fondest memory for many of us). Instead of being made up of pixels, vector images are drawn by the information represented in a mathematical vector, which is translated to geometric shapes. The resulting image is stored as a collection of specific paths, containing information about colour and size, which together outline the image.
Do you remember these? Well this is an example of a vector

The direct implication is that these paths can easily be changed without causing any loss of quality (e.g think of increasing Microsoft Word font, changing font size from 8 pt to 80 pt doesn’t make the font less crisp and clean, that is because it is in a vector format). So if image enlargement is necessary, vector images can be modified to any size without losing any image detail or causing a decrease in resolution (which is the case when enlarging raster images). These images can be printed in any size without affecting their resolution, especially with professional offset and digital printing equipment.
When editing the image, the stored vector (or path) is simply converted to the new size or shape drawn. This is great when working on logos or icons that undergo frequent size modifications.
Yes, it all sounds perfect doesn't it? Why don't we only use vector images? Well, let me burst your bubble, because vector images are not as suited as pixel images to representing complex details (which are important for certain images!). Effects like shadows and reflections need to be added by hand, using additional elements. This can make the editing process very labour-intensive.
Additionally, the formats in which vector graphics are saved (EPS, AI, PDF etc.) can only be opened with the select few programs that are compatible with them . These files can only be edited using software such as Adobe Illustrator, Adobe Acrobat, Corel Draw, Inkscape (Free) etc.
So let’s wrap it up. All in all, whether you use raster or vector graphics should depend on the intended use or purpose of the image. If you’re dealing with images containing different transition tints and shades of colour, you’re probably best off using a format reliant on Raster graphics. If you’re working with logos, which require editing and magnification without compromising resolution, then you’re probably best off using Vector graphics. It’s good to have these details figured out before starting your design project.
Below is a visual representation of why Raster graphics are better for images requiring delicate detail and smooth colour transitions:

And here is a visual representation of why Vector graphics are better if the size of fonts and logos is to be frequently edited changed:

Rule of Thumb:
1. Using RASTER graphics is like painting: you can manage color information very precisely to create detailed images (if dpi is high enough, that is). However, you cannot enlarge them without losing quality
2. Using VECTOR graphics is more like drawing: they are like sketches that can easily be reworked and resized
So hopefully you are now enlightened and that little bit more knowledgeable. Now you can go ahead and get started on that dream project!